
1.Shipping Overview
WCFM Marketplace gives you and your vendors the most flexible and powerful shipping management system for your marketplace. Most importantly, WCFM is seamlessly compatible with a number of major shipping plugins available today and you can get a glance of the same from here.
So let’s discuss how easily you can configure the shipping module for your marketplace and enjoy selling!
2.Shipping Settings and Types
WCFM provides the following shipping types for the store and they are:
- Shipping by zone
- Shipping by Country
- Shipping by weight
The above shipping types can be configured globally by admin from Admin Dashboard, and they can be overwritten by vendors as per their specific store rules.
To initiate the shipping rule, the admin will have to enable the “Store shipping” option from here: WCFM Admin Dashboard -> Settings -> Shipping settings-> Check “Store shipping” option. ( Pic ref #1)
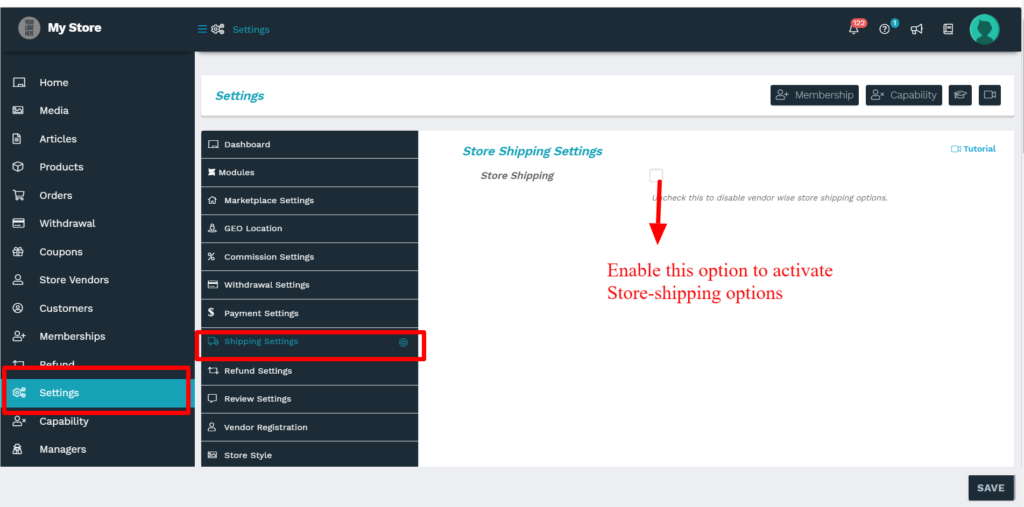
Pic: #1
Once the Store Shipping option is enabled, admin can activate the shipping methods/types as per requirement by enabling the checkboxes adjacent to shipping types as shown in the below screenshot:
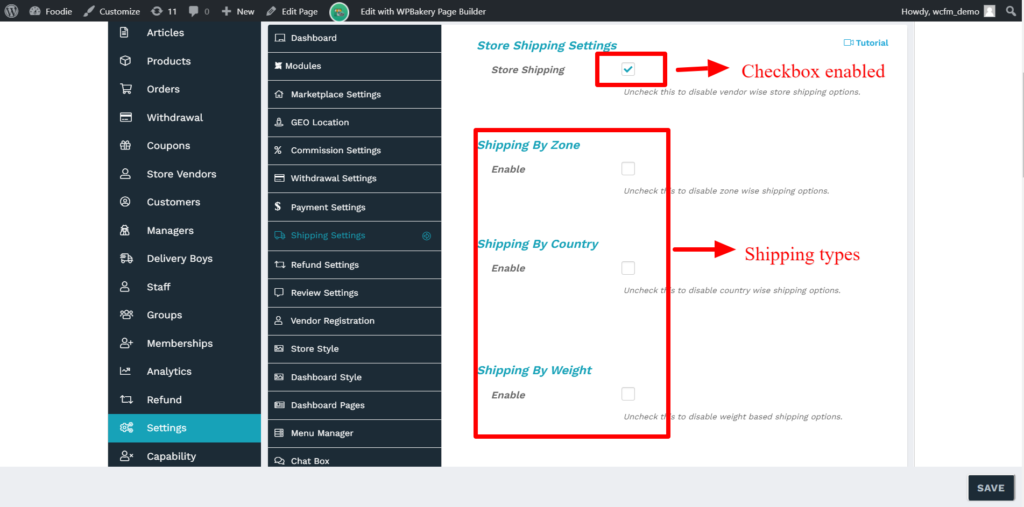
Pic: #2
Enabling the above check-boxes of shipping types ( pic ref#2) will ensure that the vendors get these shipping options to be configured in their store as well. Here’s where they can set the shipping options WCFM Vendor dashboard -> Settings -> Shipping ( Pic ref#3)
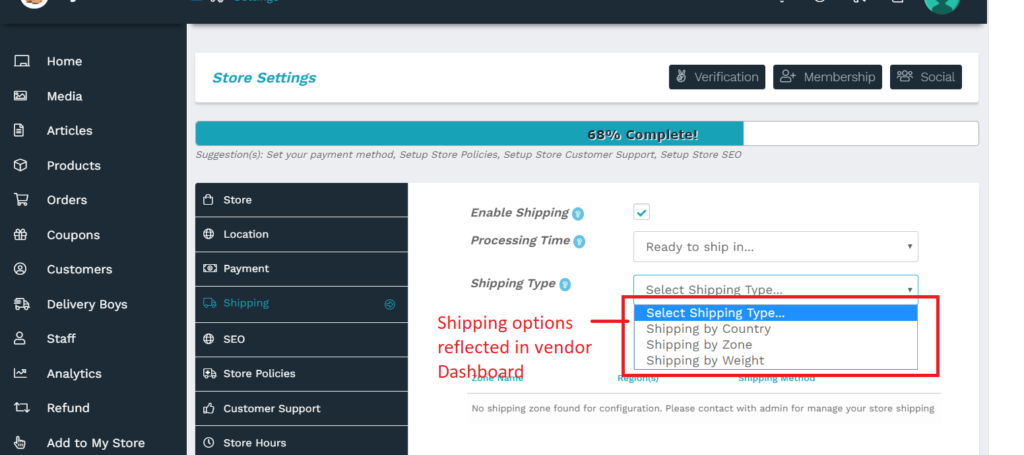 Pic:#3
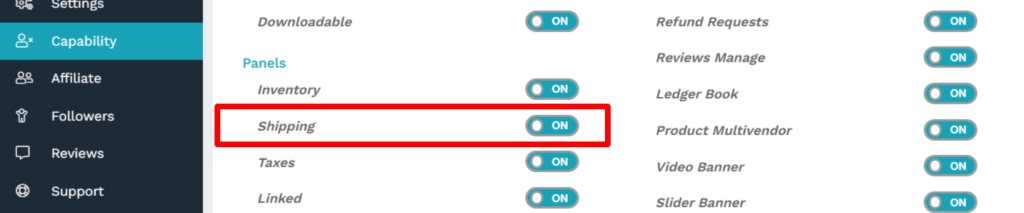
Clicking on each of these types will allow the admin to set default rules for shipping ( via WCFM Admin Dashboard), additionally the vendors can also overwrite these default rules for their own store accordingly and for this you will have to give the vendor(s) the capability to do so from here : WCFM Admin Dashboard -> Capability -> Shipping option
Let’s now discuss setting up these shipping types in your marketplace one by one.
2.1.Zone Wise Settings
A Shipping Zone is a geographical area to which you ship items, you will need to first set up shipping zones, then add methods to those zones, and lastly, rates to your methods. One can create as many zones as one may like, and add multiple methods and rates to each zone. With WCFM, these zones have to be configured globally by admin and furthermore can be set-up by vendors for their individual stores which is discussed below in detail.
2.1.1.Admin settings
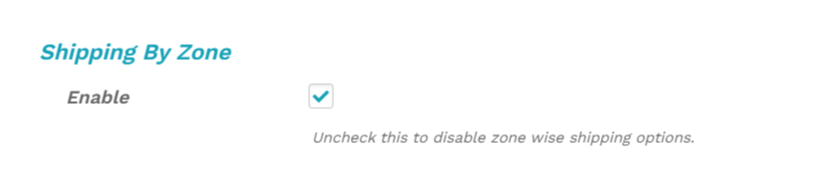
To start with, admin can allow the vendors to configure the shipping rates zone-wise by enabling the option from here: WCFM Admin Dashboard -> Settings- > Shipment settings -> Enable Shipping by zone.
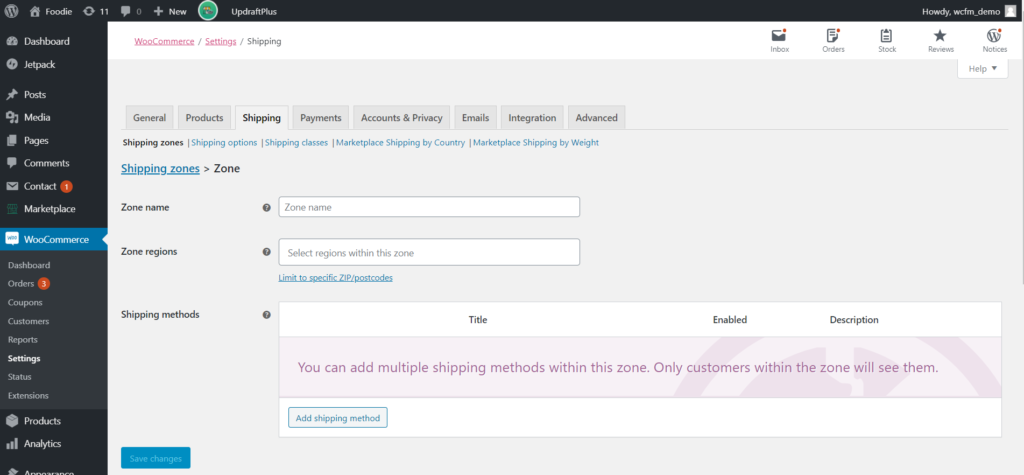
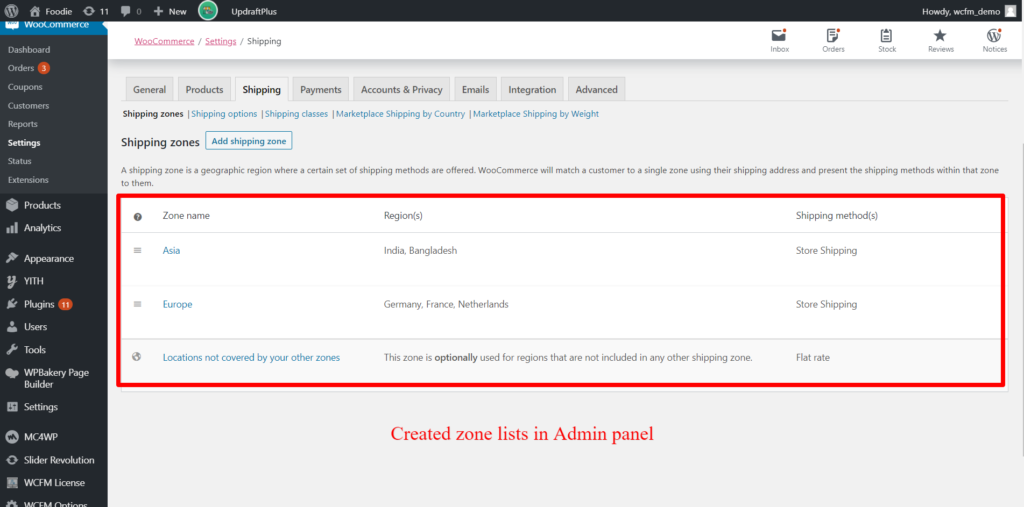
After this the admin will have to add these zones from Admin panel here: Wp Admin panel -> WooCommerce -> Settings->Shipping -> Shipping zone->Add Shipping Zone.
 Pic #4
Once you click on “Add Shipping zone” option you will be redirected to “Add shipping” page wherein you can add New zone, specify the regions in this zone, and add shipping method ( pic ref#5)
 Pic #5
Moving ahead you will have to provide the zone name, regions etc and select the shipping method as “Store shipping”, as shown in the following screen-grab(s)
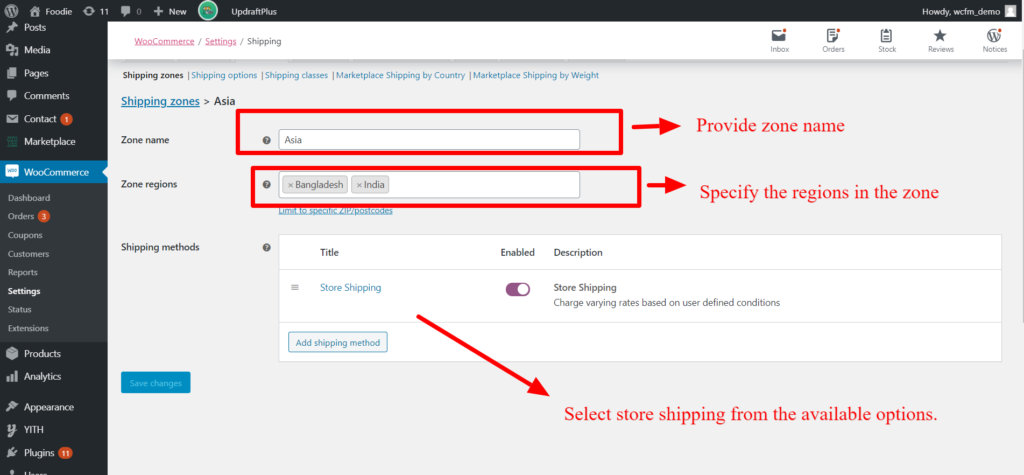
Pic 6: Description of fields available to setup shipping zone
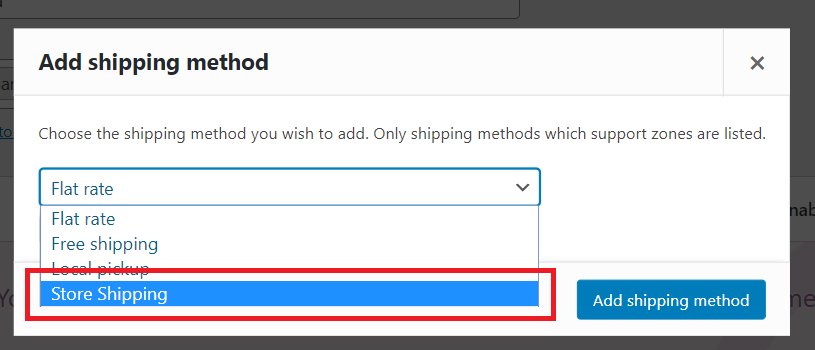
Pic 7: You must select the “Store shipping” option as shipping method from the pop-up for shipping method selection. (as shown in pic 6)
These zones created by Admin will be reflected in their Zone-listing page as shown here:
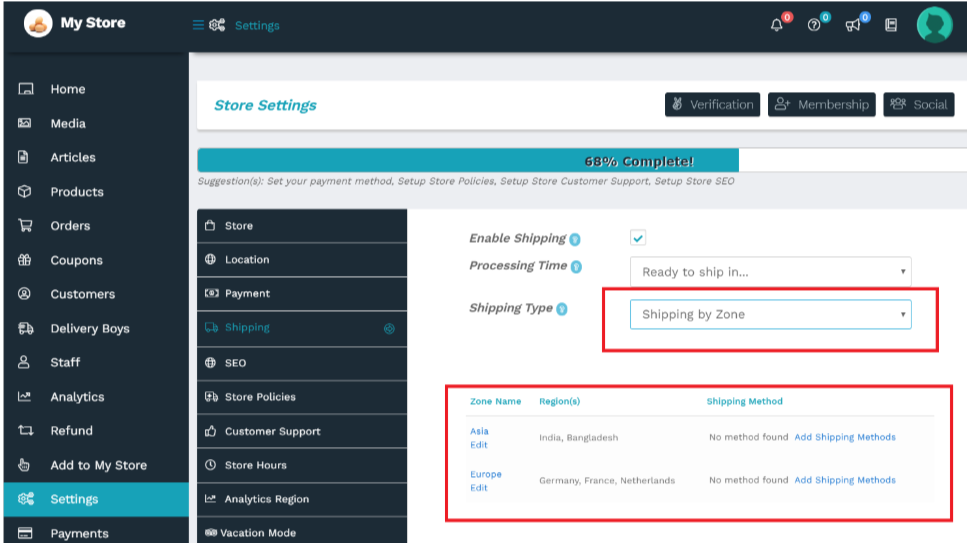
All the zones set up by the admin will be visible in the zone list for the vendor as well, and they will be configured accordingly by the vendors for their stores. Here’s a reflection of the vendor store list for reference:
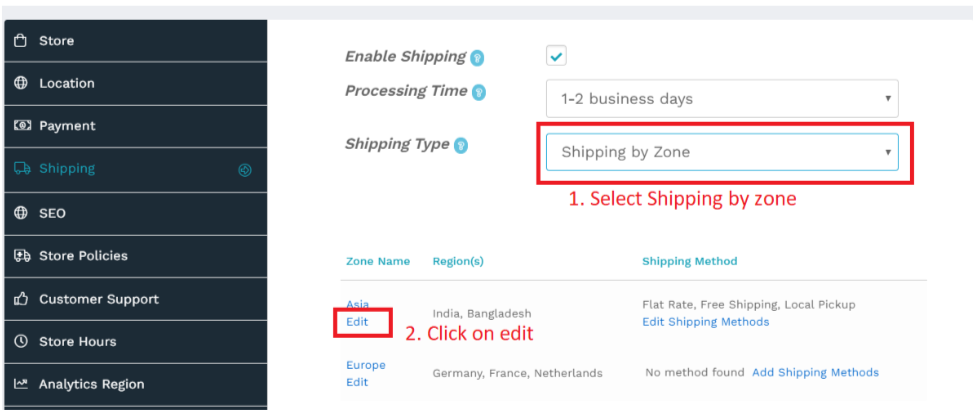
2.1.2.Vendor settings
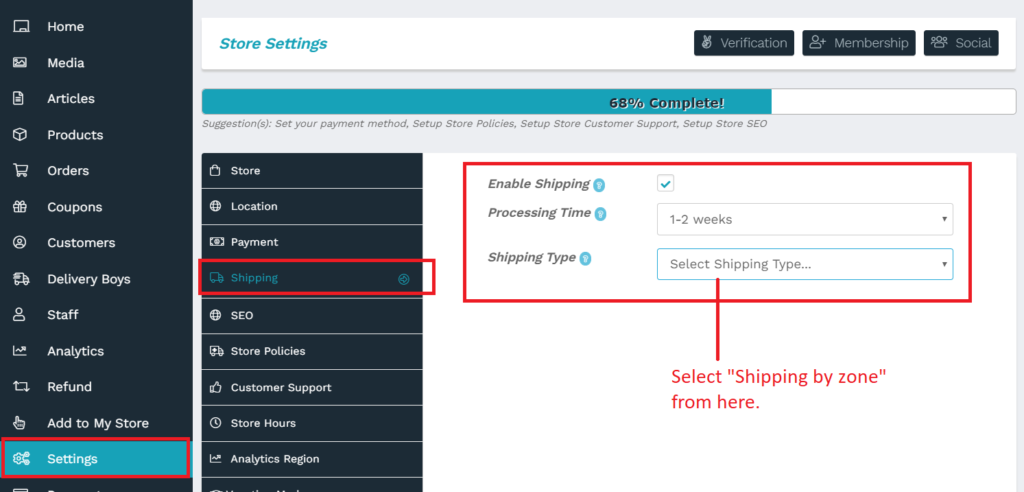
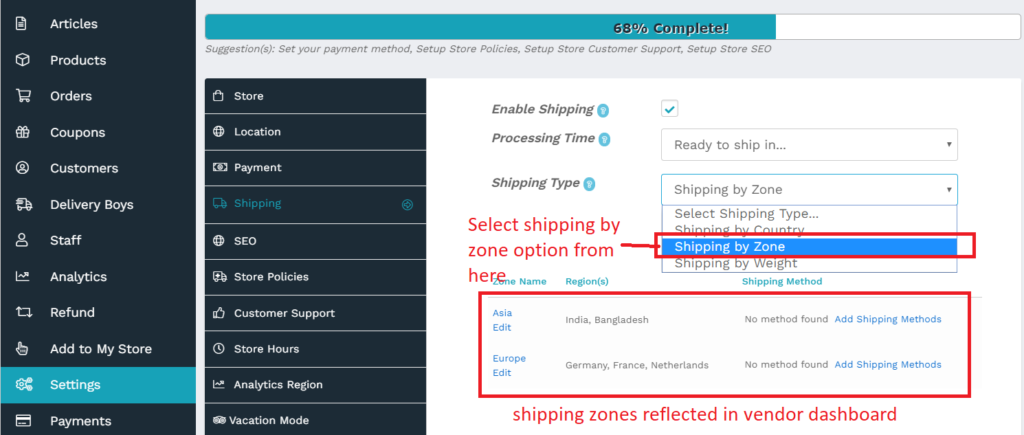
Vendor(s) have to enable the shipping option from here: Vendor Dashboard -> Settings -> Shipping and set the processing time, after this they are prompted to select the shipping type which is globally set by the admin, from here the vendor has to opt for “Shipping by zone” as shown in the screenshot below:
Once shipping by zone type is selected, the vendor gets the same zones as set by admin reflected in their dashboard here: Vendor Dashboard -> Settings -> Shipping-> Shipping by zone.
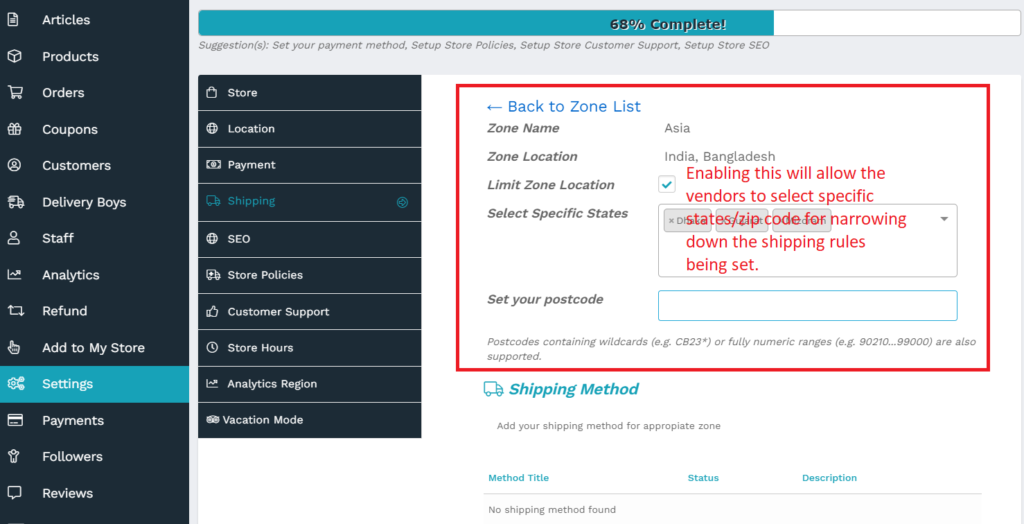
These shipping zones can be configured by the vendor as per the required by clicking on “Edit” as shown below:

Clicking on edit will redirect the vendors to edit-zone page from where they can select country states and postcode ( if applicable ) for the selected zone to enforce the shipping rules.
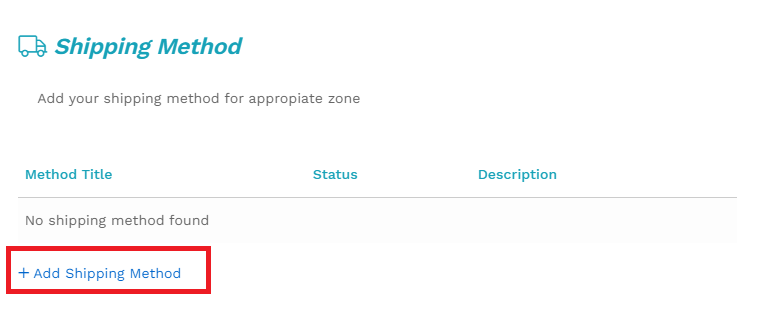
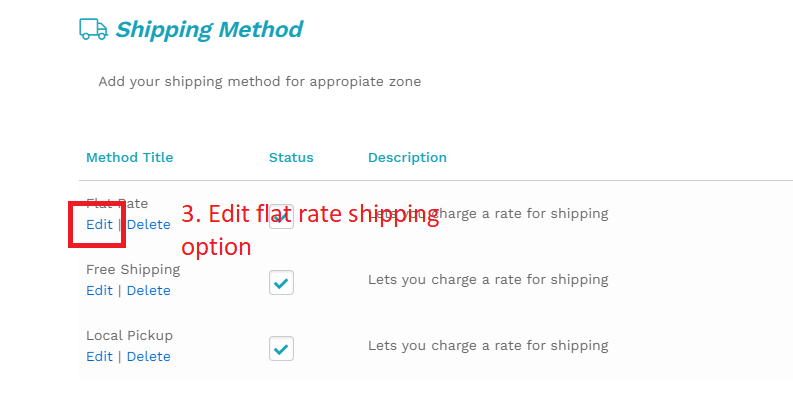
To add shipping methods, the vendor have to click on the “Add shipping Method” option:
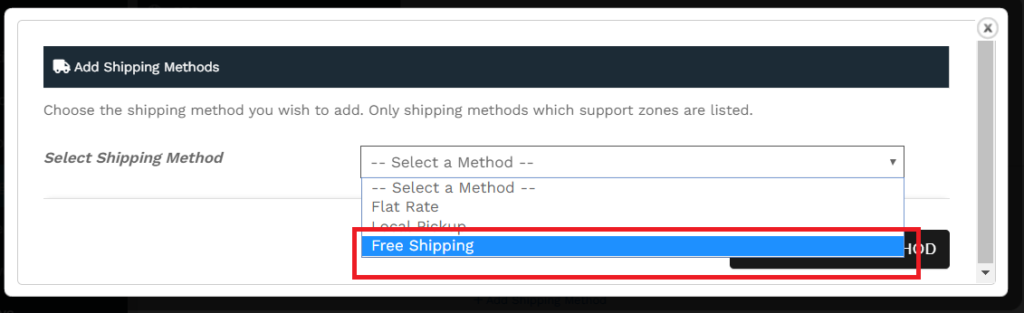
Clicking this will show a pop-up which will prompt the vendor to select the shipping method from the following option:
a. Flat rate
b. Local pickup
c. Free shipping
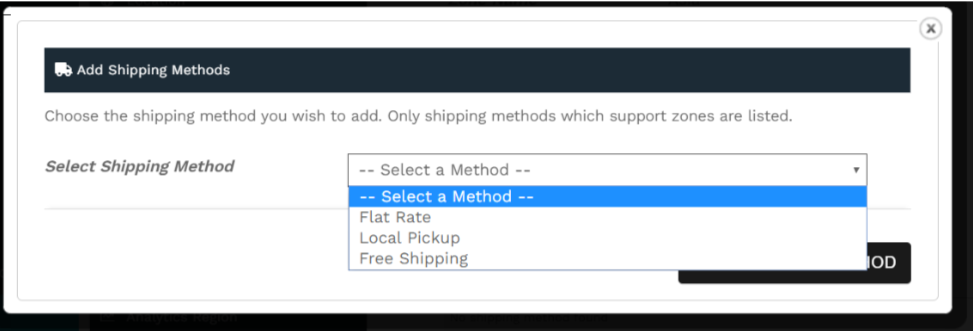
Pic :#9 : Shipping method dropdown
Let’s discuss each of these shipping methods categorically-
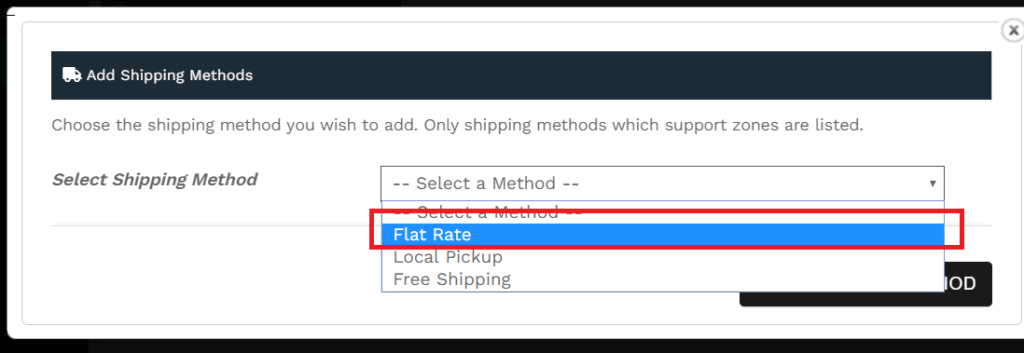
a.Flat rate shipping: Flat Rate Shipping is a shipping method that allows you define a standard rate per item, per shipping class ( * discussed below) or per order, here’s a step-wise guide on how the vendors can setup flat rate method for their individual store.
Step i ) Select Flat rate from the given dropdown show in Pic:
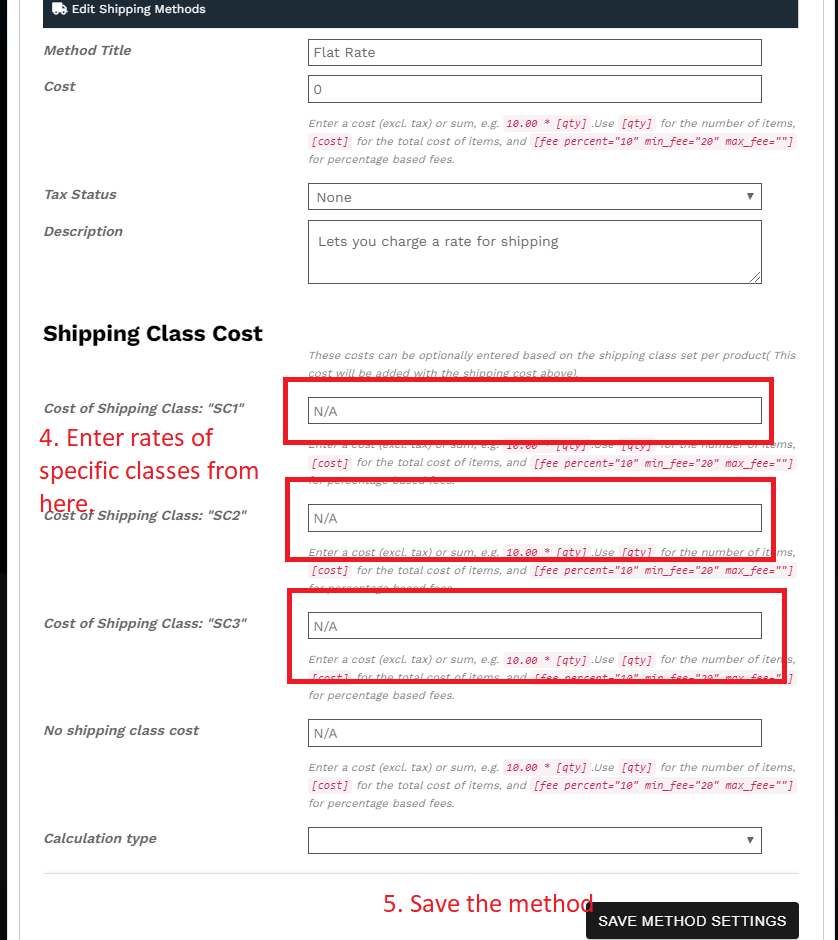
Step ii) Once you add this shipping method, it will be listed in edit zone page as shown below. As a next step, you will have to click on “Edit” button ( as shown below) to configure the flat rate method

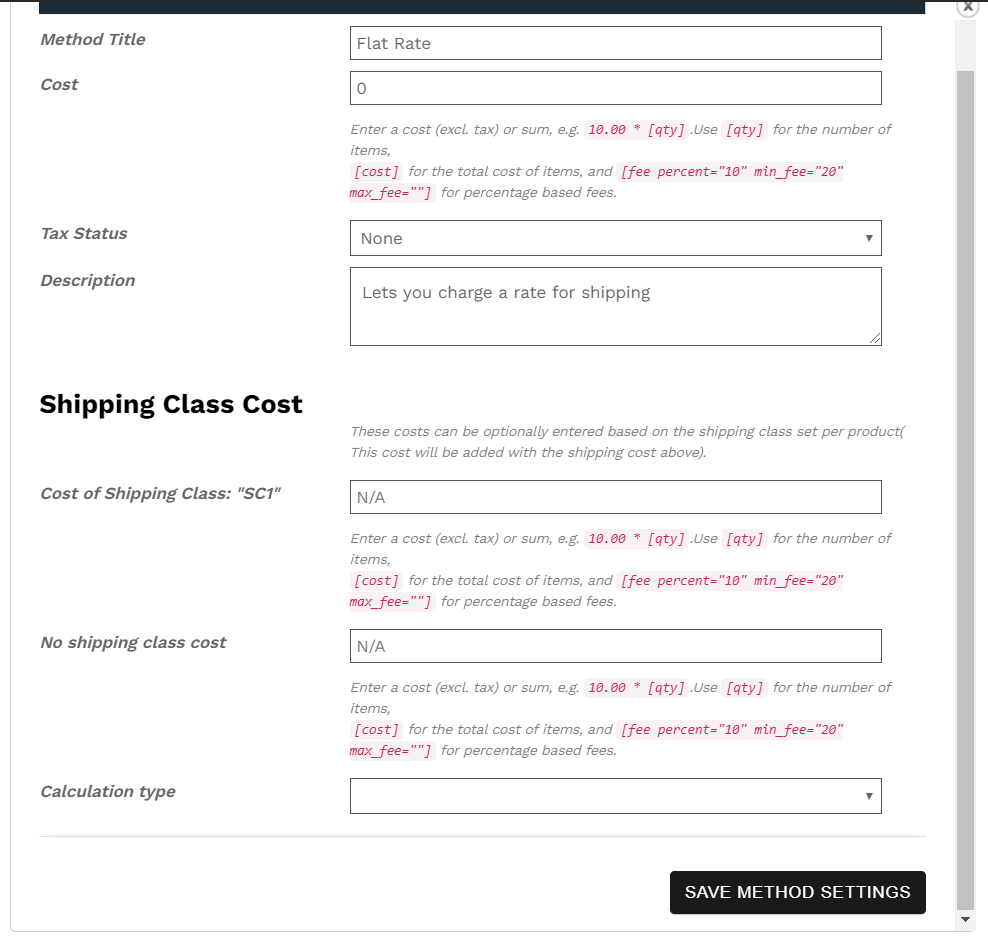
Let’s discuss the above fields in brief:
Method title: Enter a Title that displays to customers in checkout.
Cost: Vendors can add additional costs per item to this field. This can be left blank to disable Flat Rate except where costs are added for Shipping Classes. Note that what you enter here may factor into the overall cost in the Shipping Classes section unless it’s left blank.
Following are the place-holders which are to be kept in mind while entering the cost:
[qty] – Number of products in the cart
[fee] – An additional fee. This fee has two optional arguments.
percent – A percentage based on total order cost.
min_fee – A minimum amount. Useful when using percentages.
max_fee – A maximum amount. Useful when using percentages.
Example:
20 + ( 3 * [qty] ) – A base shipping cost of $20 plus $3 for each item in the cart.
15 + [fee percent=”5″ min_fee=”2″] – A base shipping cost of $15 plus 5% of the order total, which is at least $2.
Tax Status – Define whether or not tax is applied to the shipping amount.
Shipping class cost: If you have shipping classes, the interface adds a few more fields as shown in the above pic. These costs can be optionally entered based on the shipping class set per product( This cost will be added with the shipping cost above).
Cost of shipping class “X”- Enter the cost for a particular shipping class setup by admin.
No shipping class cost- Useful if you use the Per Class option. Otherwise, use the Cost field.
Calculation Type – Two options:
Per Order – Picks the most expensive option based on shipping costs in the cart.
Per Class – Charges shipping for each shipping class.
Step 3 : Once the above options are filled, save the above changes via clicking on “Save method settings” button.
b.Free shipping: This shipping method allows the vendor to set the threshold amount above which the shipping will be free. Here’s how the vendors will be able to setup the same:
Step i) Add free shipping method from the “Add shipping method” drop down.
Step ii) After saving this method, you can click on edit and fill up the following fields from the pop-up appearing.
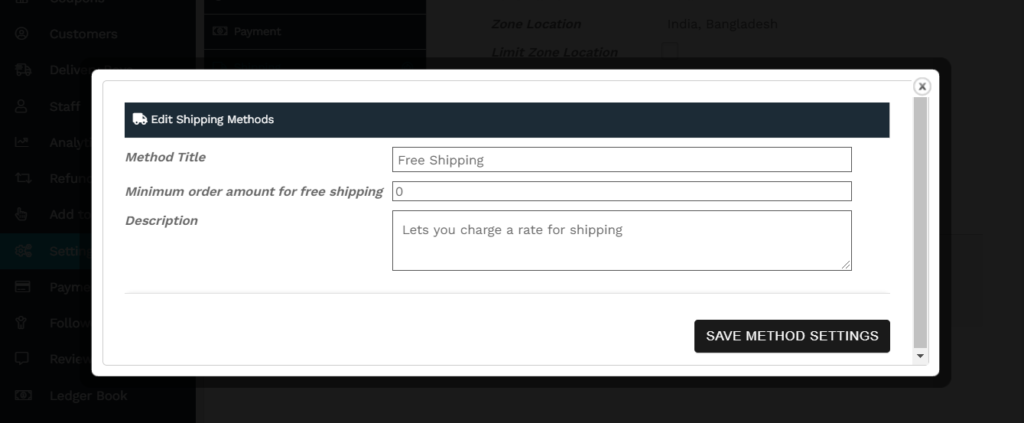
Here’s again a brief manual for the fields:
Method title: This title will be displayed to customers in checkout.
Minimum order amount : Here the vendors can enter the threshold value above which the shipping will be free.
Description: You can enter the description of the rate here
Step iii) : Save the above changes via clicking on “Save method settings” button.
c.Local pickup: Local Pickup is a method that allows the customer to pick up the order themselves.The vendors can configure the relative tax and cost from here. This is how the vendors can configure Local pickup options for their store.
Step i) Add Local pickup method from the “Add shipping method” drop down.
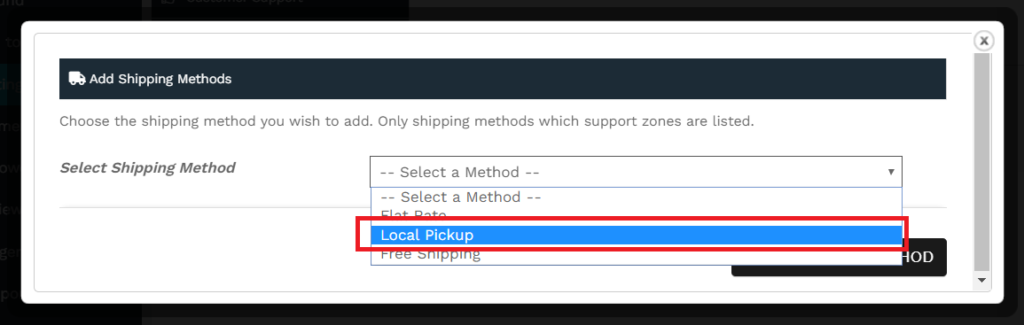
Step ii) Similar to the above methods, after saving this you will have to click on the edit option for configuring the same.
Once “Edit” option is clicked, the vendors will get a pop-up similar to this below:
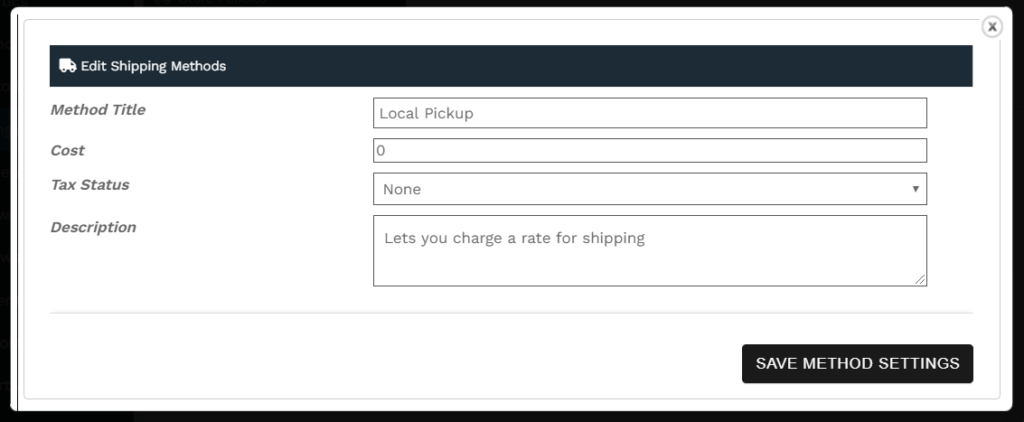
Here’s a briefing on the above fields:
Method title: This title will be displayed to customers in checkout.
Cost: Enter the cost for the option.
Tax status: Define whether or not tax is applied to the shipping amount.
Description: Allows the vendor to describe the option here
Step iii) : Save the above changes via clicking on “Save method settings” button.
2.1.3.Configuring Shipping class
Shipping classes can be used to group products of similar type and used by some shipping methods (such as Flat Rate Shipping) to provide different rates to different classes of product. With WCFM, admin( or store-owner) can basically create a number of shipping classes and allow the vendors to add shipping cost in addition to the flat rate rules set by them. Here’s how the shipping classes are configured:
a.Admin can setup shipping classes from WordPress backend here: Goto WP Admin Dashboard -> WooCommerce -> Settings ->Shipping- > Shipping classes
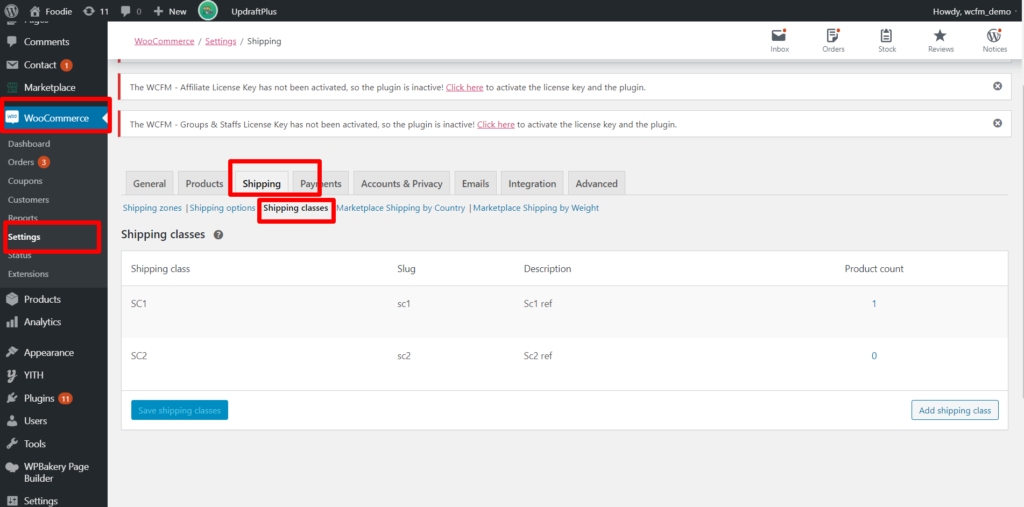
b. Click on Add shipping class button
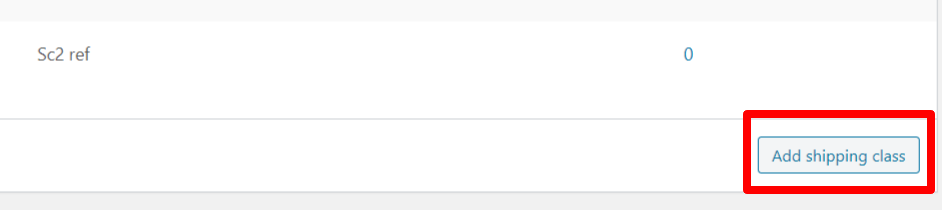
c. Now you can provide your class name and it’s slugs as show below
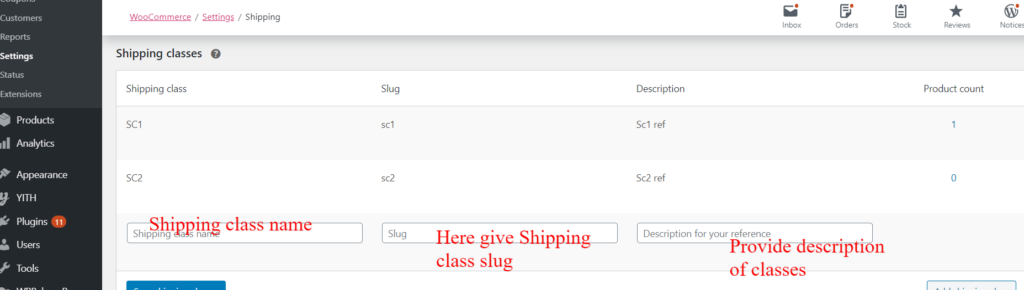
d. Once the above fields are populated then click on ‘Save shipping class’ button to finally declare the class.
e. Now admin can assign these declared classes globally ( by default) for individual products, for that Goto Admin Dashboard -> Products-> Edit product page-> Shipping -> Shipping class ( dropdown)
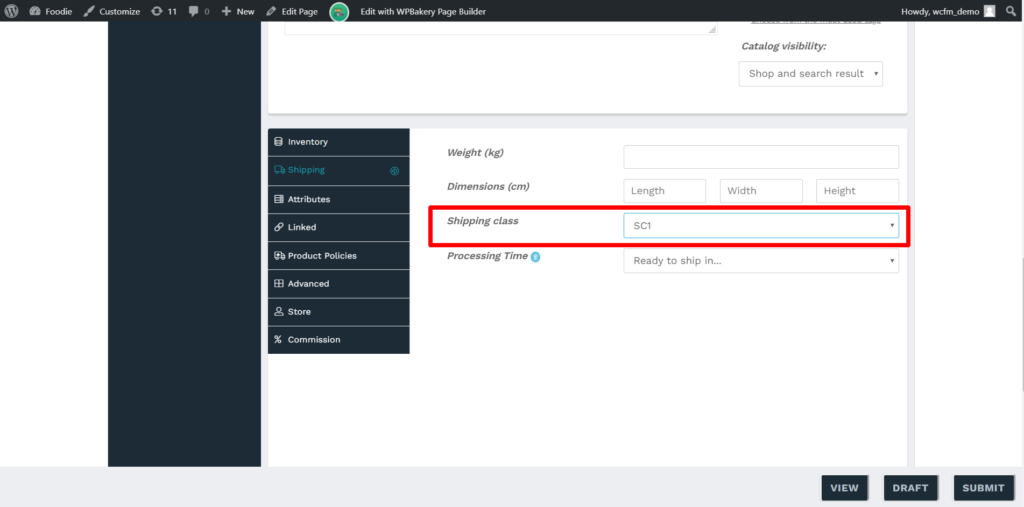
This same shipping class can be overwritten by vendors from Vendor Dashboard as well in the edit product page of that same product.
f. Vendors can also configure the Flat shipping rates from shipping tab : WCFM Vendor Dashboard -> Shipping ( then clicking on Flat rate method from “Edit zone” section ) Here’s a screen-grab of the steps:
2.2.Distance Rate Shipping
In addition to zone, country and weight, WCFM permits it’s users to set the shipping cost based on distance between vendor and user location.
2.2.1.Admin Setting
Admin can enable/disable the Shipping by Distance option from the following section: WCFM Admin Dashboard -> Settings-> Shipping settings. From here “Check” the enable button in Shipping by distance settings and one can see the following options.
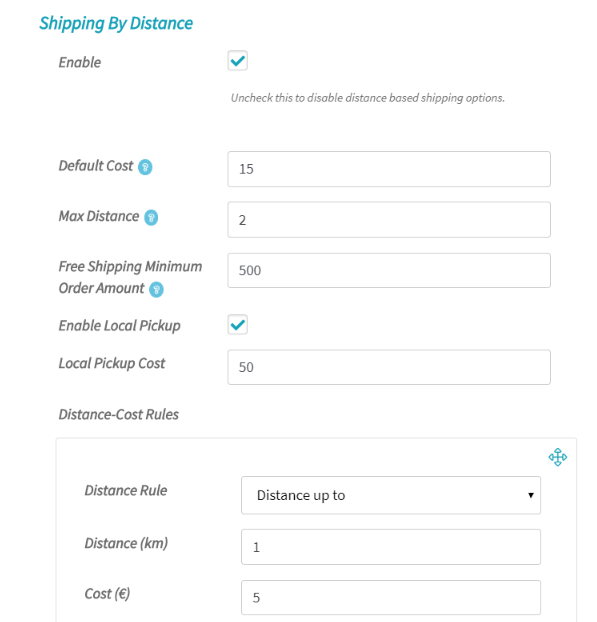
Admin allow to set default rule for all vendors. Off course, vendors are allowed to override this form their own shipping setting panel.
Default Cost: This will be the base shipping price of all the products, if any matching distance rule found then this will be added with rule cost. You may leave this empty to work with only rule cost as well.
Max Distance: You may set this restrict upto maximum distance product will be deliverable. E.g. if you set this 2, then product will be deliverable upto maximum 2 km/mi. May leave empty and this will be consider as no maximum limit.
Free Shipping Minimum order amount: The amount entered here will be the benchmark above which the shipping will be free.
Enable Local Pickup: Check this to enable “Pickup from Store” option for distance rate shipping
Local Pickup Cost: Pickup form store cost
Distance-cost Rules: You may setup any number of rules for distance rates. E.g “Upto 1 km cost $5”, “upto 2km cost $10”, “more than 2km cost $15”. Just be sure, there should not be any conflicting rules.
2.2.2.Vendor Setting
Similar to Admin, the vendors can also configure the distance shipping rates from their Dashboard here:
WCFM Vendor Dashboard -> Settings -> Shipping -> Select “Shipment by Distance”
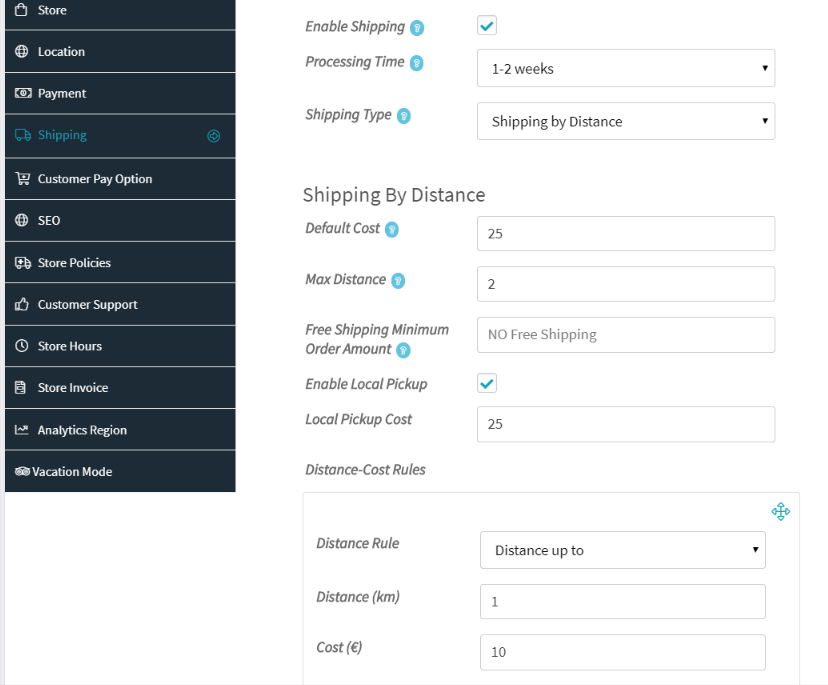
Note that this option will only be available to the vendors only if “Shipping by Distance” globally enabled by Admin globally.
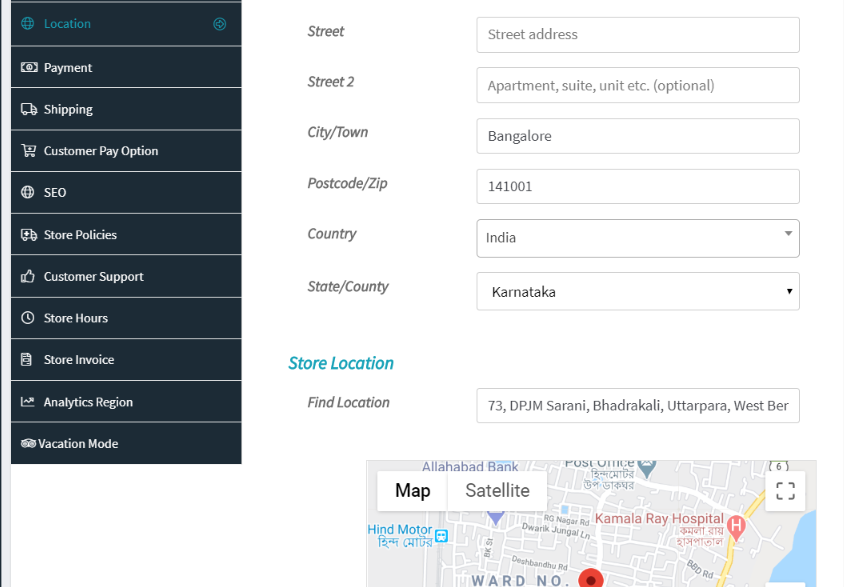
To work with distance rate shipping vendor’s location is essential. So be sure, vendors has their location using map from their setting -> Location
2.2.3.Distance Shipping at Checkout
To calculate shipping based on distance users has to insert their location using map at checkout page –

As soon as users will insert their location shipping will be calculated and shown –
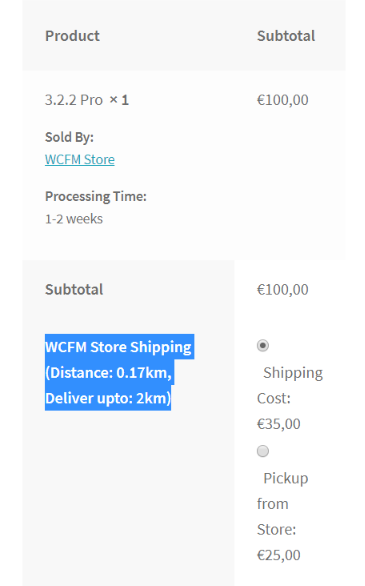
Now, if user’s location distance more than vendor’s deliverable “Max Distance” then such an error message will be shown and order processing will be blocked –

2.3.Shipping by country
In addition to zone and weight, WCFM permits it’s users to set the shipping cost in terms of specified countries.
2.3.1.Admin settings
Admin can enable the shipping by country option from the following section: WCFM Admin Dashboard -> Settings-> Shipping settings. From here “Check” the enable button in Shipping by country settings and one can see the following options.
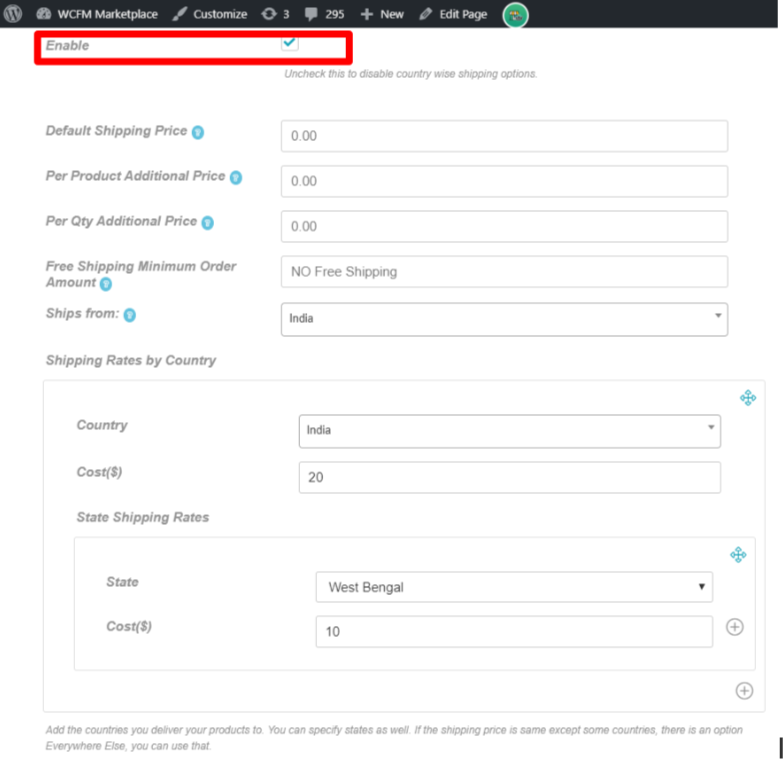
The “shipping by country” settings admin can set 4 different types of default cost.
Default Shipping Price: This will be the base shipping price of all the products of the vendor irrespective of countries and states.
Per Product Additional Price: This cost will we applied to every second type of product from the same vendor in the cart.
Per Qty Additional Price: This cost will be applied to every second quantity of the same product of the vendor which is present in the cart.
Free Shipping Minimum order amount: The amount entered here will be the benchmark above which the shipping will be free.
Shipping calculation:
The following options needs to be set for shipping calculation as required.
Ships from: The country from where the vendor ships products.

Shipping rates by country:
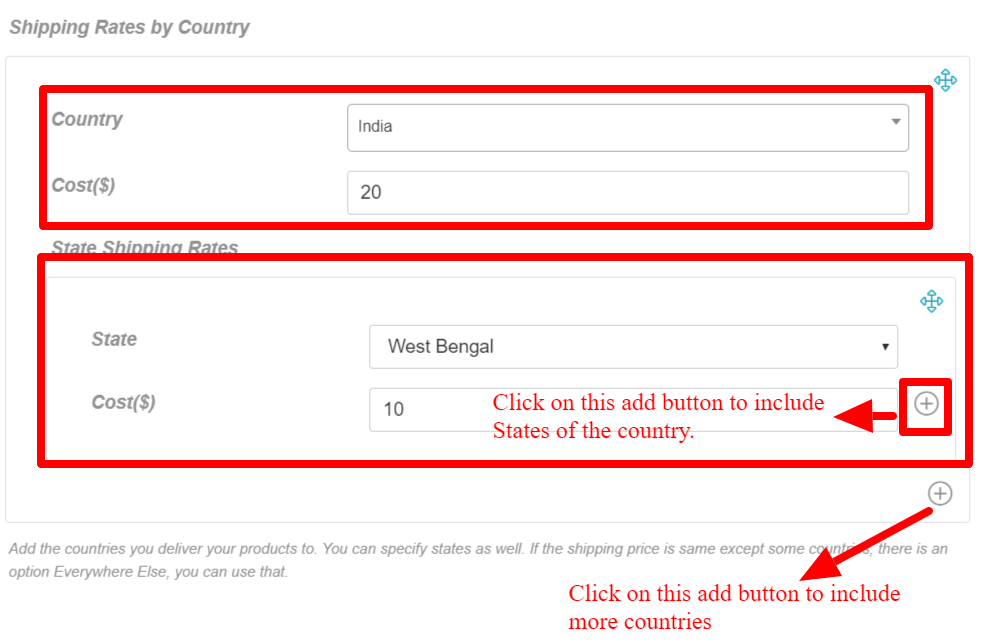
From the above section shown the Admin can set the shipping price for each country selecting the country name from each dropdown. The number of country selection box can be increased by clicking the plus sign in the bottom of the country selection box.
Shipping price for states of individual countries can also be entered by selecting the state names from State Shipping Rates box and entering the shipping cost of the respective states. The number of state selection box can also be increased per country by clicking the plus sign in the bottom of the state selection box.
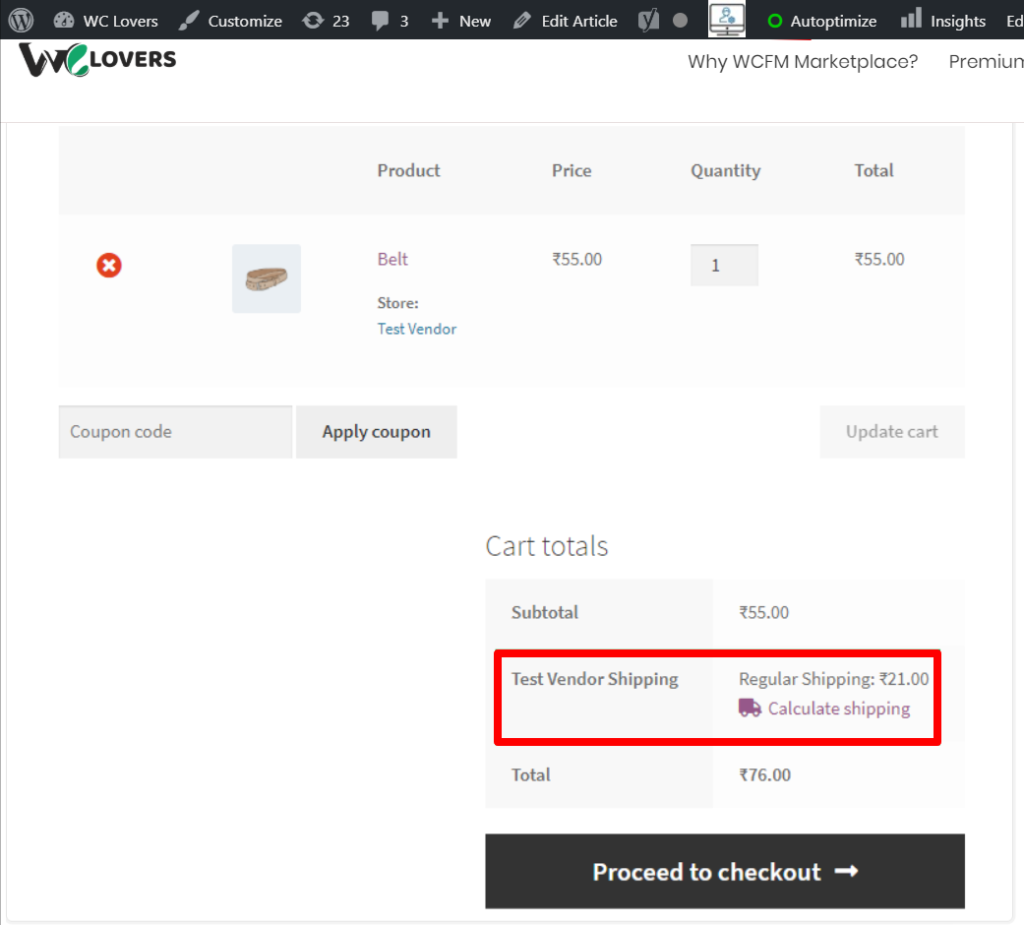
When the customer adds the product of the vendor in the cart the shipping cost for the vendor will be calculated according to the shipping country selected by the customer as shown below:
2.3.2.Vendor settings
Similar to Admin, the vendors can also configure the shipping rates related to country from their Dashboard here:
WCFM Vendor Dashboard -> Settings -> Shipping -> Select “Shipment by country”

Note that this option will only be available to the vendors if it’s enabled by Admin globally for the vendors.
Once Shipping by country option is selected, the vendors will be able to see the following options:
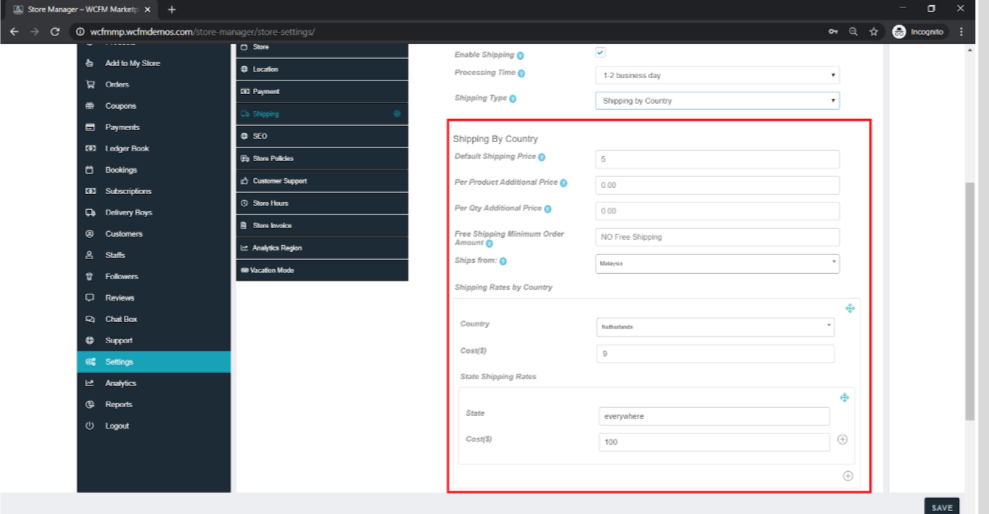
The above options will allow the vendors to set the shipping rates for specific countries and their correlated states.
2.4.Shipping by weight
WCFM Allows both admin and the vendors to set shipping rules in relation with the weight of the products ordered.
2.4.1.Admin settings
Admin Settings: Admin can set the shipment rules by weight from the following path : WCFM Admin Dashboard -> Settings -> Shipment Settings -> Enable Store Shipping Settings -> Enable Shipping by weight.
Once this option is enabled the admin will get the following options as shown below:
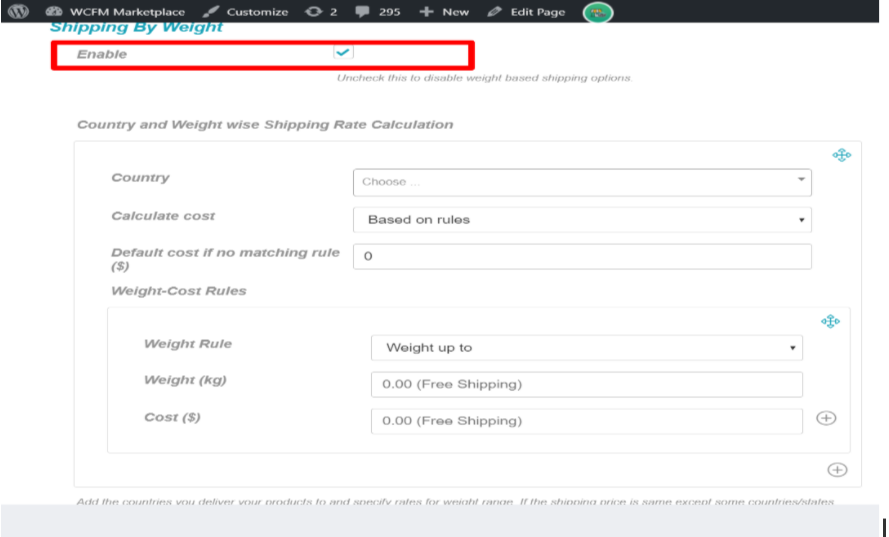
Here’s a brief of weight-wise shipment settings options available
Country :User can enter the country from where he/she can allocate specific shipping rules
Calculate Cost: Here user can set the terms on which shipping cost will be calculated. They can either set it “As per rules”, where other relative information should be provided. Or “Per unit cost”, where the user will be able to enter $/kg rate ( per unit cost)
- Calculate cost based on rules: If the user chooses to set rules for the calculation, they will get the following options as shown.
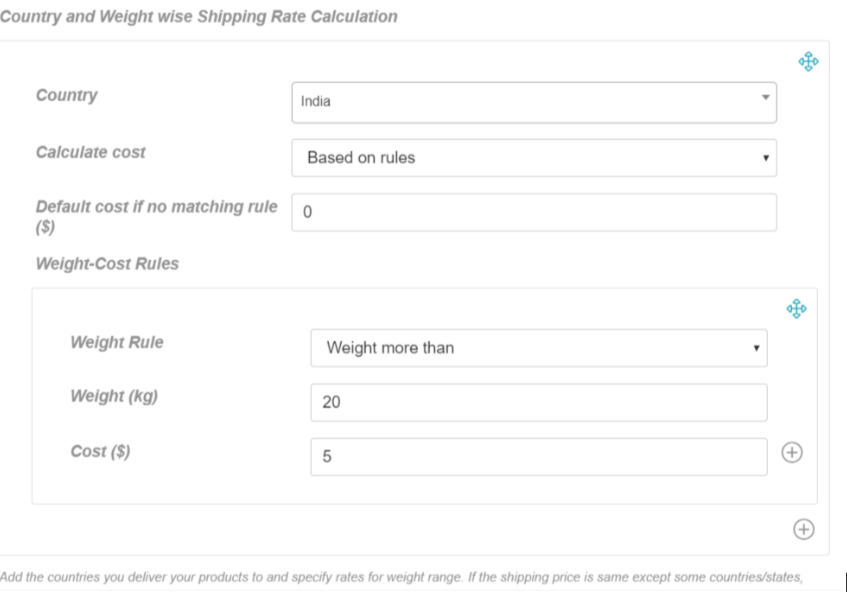
Weight rule: One can set the weight rule from here by either selecting “ weight upto” or weight more than” option.
Weight: The amount of weight can be entered here.
Cost: Here the user can add the additional cost which is to be paid by the customer once the weight decided is exceeded. - Calculation based on per unit: If the user chooses to set rules on unit basis they will get the following options as shown:
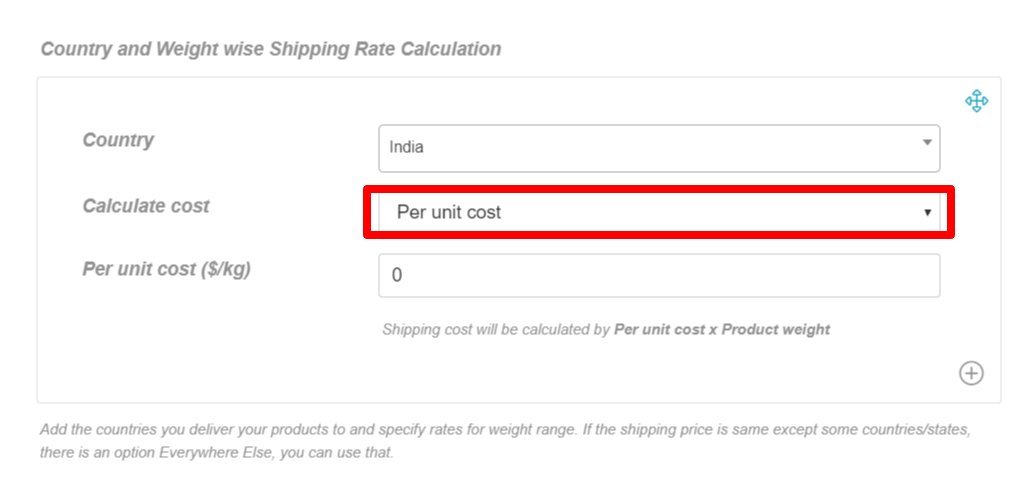 Once per unit cost is selected, the user will be prompted to enter the cost which will be added per Kg.Note that the user can add more countries and set rules by clicking on the (+) icons.
2.4.2.Vendor settings
The vendors can also configure their shipping rates related to weight and these values will overwrite the data entered by the admin in their settings. They can do the same from here: WCFM Vendor Dashboard-> Settings-> Shipping-> Set shipping type to shipping by weight.
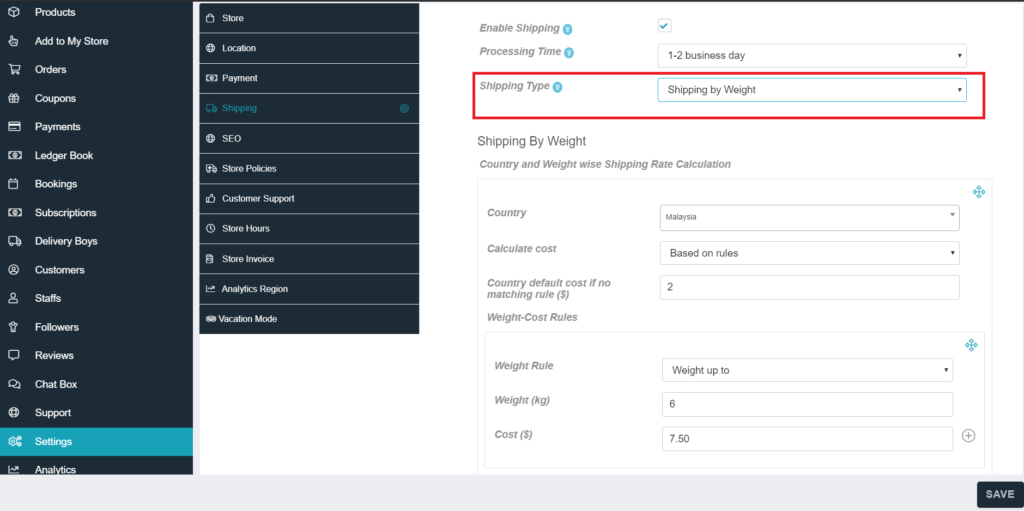
Once Shipping type is selected as “Shipping by weight” then the vendors will be able to see all the options similar to those provided to the admin. There they can set specific country, cost, weight rule, cost etc.