
In a previous article, we argued why you should consider adapting an on-premise multi vendor solution while building your next marketplace startup. This article will take you through the various steps of building a basic online marketplace on WordPress with the help of a powerful multivendor plugin like WCFM Marketplace. But you might ask…
Why WordPress?
Now, if you search for “the best website builders” on Google, you would definitely come across WordPress in at least the top five names. To give an overview, WordPress is a content management system (CMS) that can be used to create any blog or website. It is an open source software, which means, you can freely customise the platform according to your needs. From the official website of the White House to the apparel eCommerce site of Van Heusen, almost 34% of websites are built on WordPress!
But now you might wonder how WordPress could be the best option for building your marketplace and why are we so biased towards WordPress? Well, there are more than just one reason to trust WordPress for your marketplace and we’re listing just a few.
1. Ease of customization
WordPress is best known for its flexibility towards customization. Being an open source platform, it gives you complete control on each and every aspect of your website. WordPress has a plethora of plugins and addons, most of them within $100, which can help you build any type of website including a marketplace.
2. User friendly interface
You don’t need to know coding in order to use WordPress. WordPress’ interface is one of the most user-friendly interface among other website builders. Most of the configurations in WordPress are almost one-click affairs. That is why WordPress can be used by non-techies as well. Although, if you have some basic knowledge of PHP, you can do a lot more in terms of customisation! However, once you familiarize with the new system, building and managing your marketplace would be a cakewalk.
3. Secured platform
WordPress has become pretty serious regarding its security. The new and improved security plugins provided by WordPress adds an extra layer of security to your website from hackers. Also, WordPress’ themes and plugins are well-vetted and secured. However, internet in it-self is pretty vulnerable and hacking is possible even on the most secure platform. But if you follow a few essential cautionary steps to keep your website secure, WordPress is one of the most secure platforms for your marketplace.
4. Community support
One of the best things about WordPress is its widespread community consisting of not just the technical support team of WordPress but WordPress fanatics as well. Since WordPress is used all over the world and is customized in a variety of ways, you will readily get a solution if you’re stuck somewhere. There are numerous articles and blogs written on WordPress and it’s various aspects which would also help you learn more about this platform and manoeuvre it better.
5. Cost effective
Yes, WordPress is free. You need not spend a single penny to download, install and use it for the entire life. Apart from the hosting and the plugins that would be required to build your marketplace, you literally never need to pay any recurring charges. This becomes a great option for startups since capital is a major factor for new businesses. Moreover, in the case of startups, releasing the MVP (minimum viable product) is more important in order to validate the business idea and its feasibility than spending on the development of the perfect marketplace.
There are various other reasons why you should opt for WordPress but explaining them here would divert us from the focus of the article, which is, to create an online marketplace on WordPress.
Now before going on to the step-by-step process of setting up your marketplace, let’s have a look at the things you would require to build it up:
a. A domain Name
b. Web hosting
c. WordPress
d. WooCommerce
e. WCFM Marketplace – the best multi vendor eCommerce plugin
Let’s delve deeper into the steps…

Step 1: Buying a Domain Name
The first step when you start building your marketplace should be to choose the right name for your business. Your domain name must be similar to the name of your business – it’s your identity on the web! But chances are that somebody has already thought of that name and owns it! Therefore, you’ll have to do some hit and miss in this stage until you find that perfect domain name for your marketplace.
Try playing with the name if the exact domain name is unavailable. For example, if your company’s name is My Marketplace and mymarketplace.com is taken, try searching for something like my-marketplace.com or mymarketplaces.com.
Also, try for the .com as it is the most popular domain for commercial organizations and is a top-level domain (TLD). Many keyboards and even mobile keypads nowadays have dedicated keys for .com, making your website easier to access..
There are several domain name registrars around the world that you can choose from. Some providers are country specific, i.e., they can sell domain names with country-specific extensions like io., in. or ly. But before choosing your domain provider, do check their pricing. Usually, a domain name should not cost more than $15 a year. However, make sure that there aren’t any hidden cost or post-purchase pricing involved while you buy your domain name. Some of the popular domain name registrars include Domain.com, GoDaddy and Bluehost among others.
Once you select the domain registrar, go to their website and start searching for the available names. Then choose the domain name of your choice, proceed with the payment steps and carefully complete the transaction. Your prefered domain name will be registered under your name and can be used to build the identity of your website.
With the new domain name in hand, let’s proceed to the next step, that is…

Step 2: Hosting your marketplace website
Just as a retail store has a physical space where customers can walk in to shop for what they want, your online marketplace, too, needs a space on the web where you can drop in all your website content like HTML, CSS, JS, images, video, pdf etc. Web hosting gives you that space. When creating a website on WordPress or any other pre-existing software, you need to self-host your website, that is, purchase the hosting from a hosting provider. While several web hosting providers are available in the market, there are certain points you should keep in mind before you choose one, like whether you want a shared server, a VPS or a dedicated server.
Now, some of the web hosting companies let you buy your domain from their website itself. In that case, you don’t have to buy it separately from other domain providers (makes your task easier, right?) Bluehost offers domain name for free for the first year when you purchase their hosting.
Another important feature that you should look out for your hosting provider is the SSL certificate. SSL establishes an encrypted link between a browser and a server. In simple terms, it’s a kind of security standard for your website. You must have seen a tiny box mentioning “Secure” at the left hand corner of some website’s URL, where the URL begins with https://. This shows that the website is secured and is safe for transactions. Marketplaces involve various kinds of monetary transactions. Therefore, it is crucial for your marketplace website to have the SSL certificate in order to gain your customer’s trust. While some of the hosting providers provide free SSL certificate, some allow you to buy the certificate at an extra cost from within their website. Alternatively, you can buy your SSL certificate separately and later link that to your hosting.
Go to your preferred hosting provider’s website and select the plan best suited for your marketplace. Follow their simple steps like creating your account and providing billing details to proceed with the purchase.
After completing your transaction, you will be provided with an email containing your web hosting control panel (cPanel) access details. Once you login to your cPanel, head on to the next step, that is…

Step 3: Installing WordPress and an e-Commerce plugin
Most providers nowadays offer one-click WordPress installation. If you select WordPress-specific hosting plan from your hosting provider, WordPress comes pre-installed as you login to your cPanel. Alternatively, your hosting provider might provide one-click WordPress auto-installers like APS, Fantastico or Installatron available in your cPanel account. But, if your provider doesn’t offer auto-installation of WordPress, you’ll have to do it manually.
You will be able to download the WordPress package from https://wordpress.org/download/ for free. The official site of WordPress also provides a very detailed guide on installing WordPress for beginners to follow.
Post installation, you’ll be able to login to your WordPress dashboard. A login prompt will appear where you will have to enter the credentials (the password that you’ve set while setting up WordPress) and voila! You can now start setting up your marketplace website!
But WordPress will only help you build a normal website. In order to create an e-commerce site, you’ll need an e-Commerce plugin. WooCommerce is the best and the most popular eCommerce plugin available for WordPress. WooCommerce, too, is open-source and can be customised to a greater extent!
Again, some hosting providers like Bluhost provide auto installation of WooCommerce along with WordPress. However, if you require to install WooCommerce manually, you can check out this detailed guide on how to install the plugin.
This leads us to the most important step of the entire process, that is…

Step 4: Installing WCFM Marketplace – the best multivendor plugin
As the name suggests, a multi-vendor plugin helps you build a marketplace where there is more than one seller and each seller has one or more than one stores. Now, there are several multi-vendor plugins available in the market, but we’re going to focus on the smartest multi-vendor marketplace plugin in today’s market – WCFM Marketplace. WCFM Marketplace is also open-source just like WordPress or WooCommerce WCFM Marketplace has a bundle of out-of-the-box features which will not only help you build your marketplace easily but provide unique features to your marketplace. With zero coding required, you can easily set up your marketplace within minutes. However, without delving deep into why WCFM Marketplace is the best choice, let’s get started with the step-by-step process.
1. Download the free WCFM Marketplace plugin either from WordPress.org (https://wordpress.org/plugins/wc-multivendor-marketplace/) or from our official site (https://wclovers.com/).The file will be downloaded in Zip format.
2. Login to your WordPress Dashboard.
3. Click on Plugin on the panel towards the left side of the dashboard.
4. You’ll be able to see the installed plugins (currently only WooCommerce) on the Plugins page. Click on Add New.
5. Click on Upload Plugins at the top of the dashboard.
6. Click on Choose File, browse the WCFM Marketplace plugin file from your desktop, upload it and click on Install Now to install the plugin.
7. Once done, go back to the Plugins page. Now you’ll find that WCFM Marketplace is available under the available plugins. Then, activate the plugin by clicking on Activate under the specific plugin.
These steps will let you install and activate the plugin on to your WordPress dashboard. Now, it’s turn to set up your marketplace.
Step 5: Setting up your multivendor marketplace
Setting up your marketplace with the help of WCFM Marketplace is easy. At the end of these steps, you’ll get to setup your marketplace on the basic level.
A point to note here is that WCFM plugin is necessary for using WCFM Marketplace and comes as a package when you download and install WCFM Marketplace.
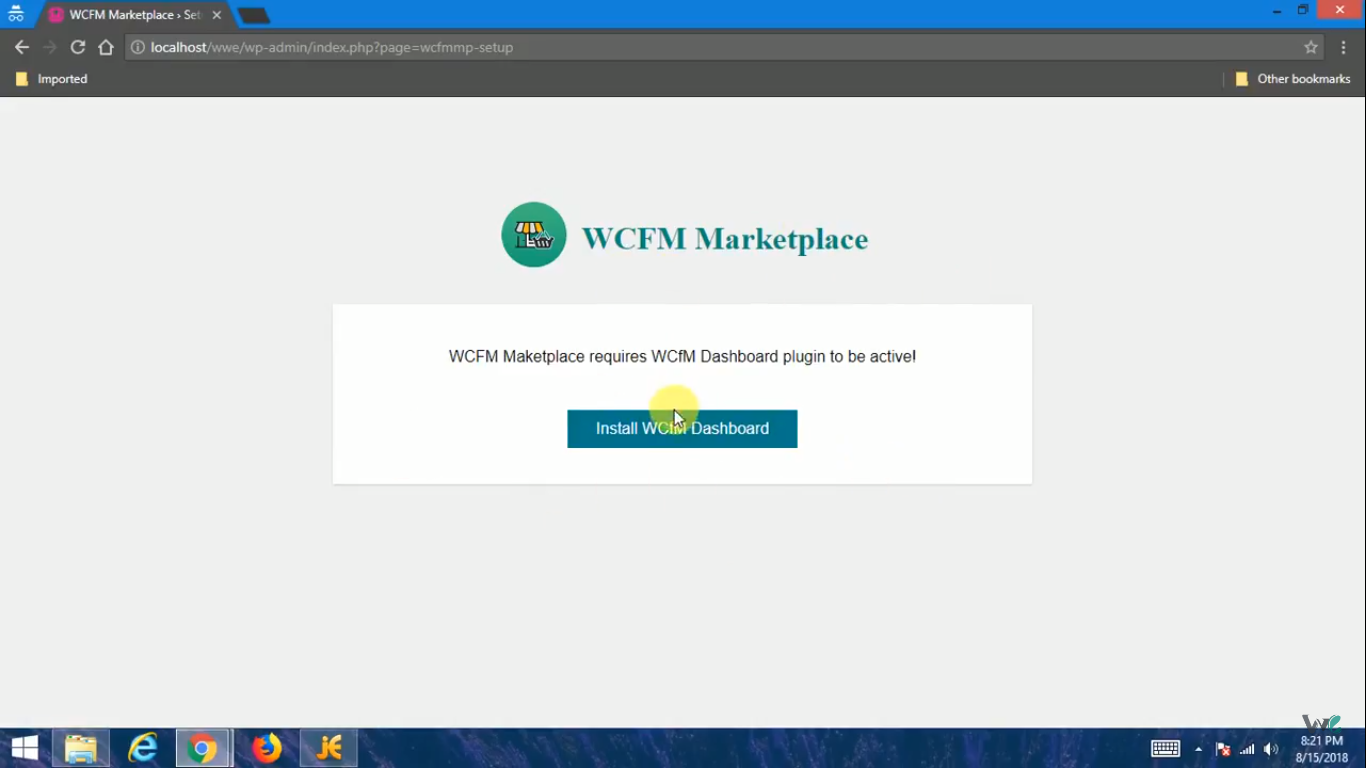
1. Once you click on the Activate button (previous step) under the specific plugin on the Plugins page, you’ll find a prompt to activate WCFM Dashboard. Click on Install WCFM Dashboard.
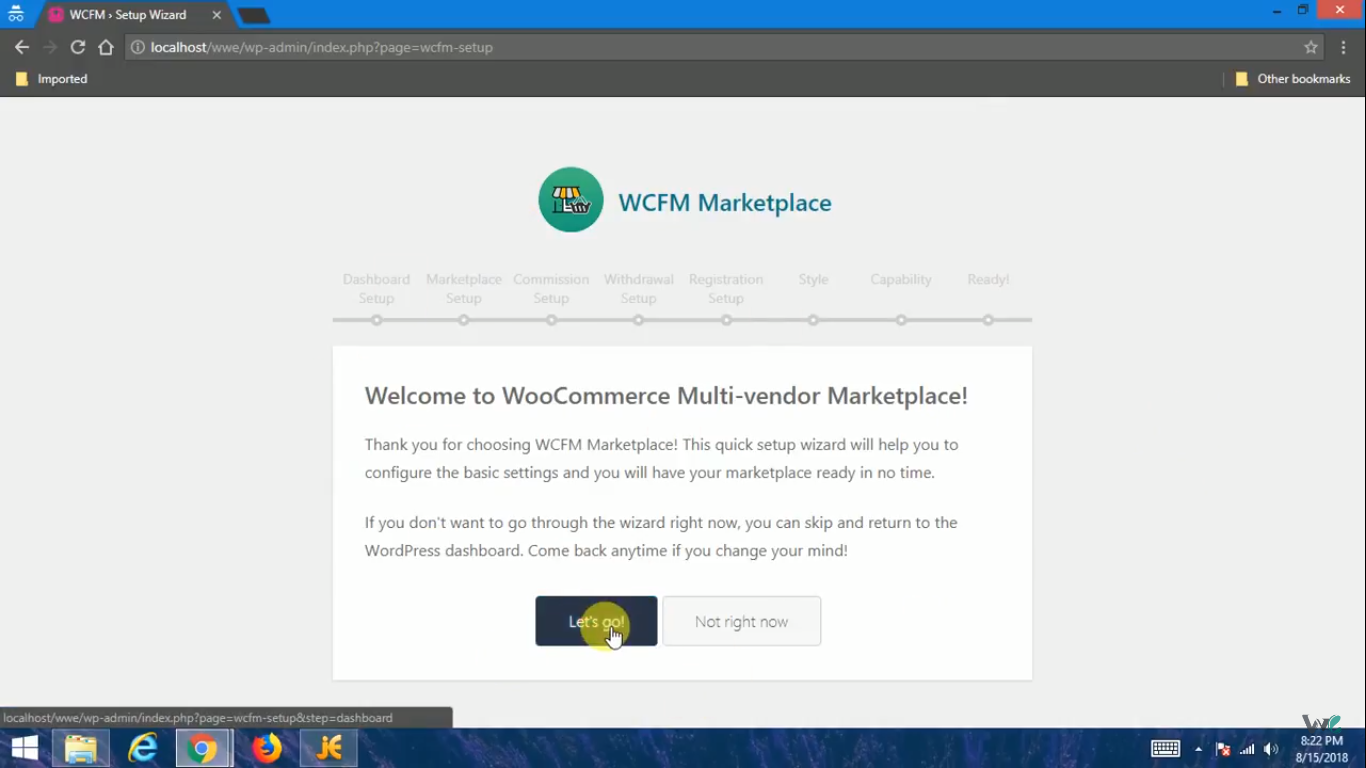
2. The WCFM Marketplace setup prompt will appear. Click on Let’s Go!
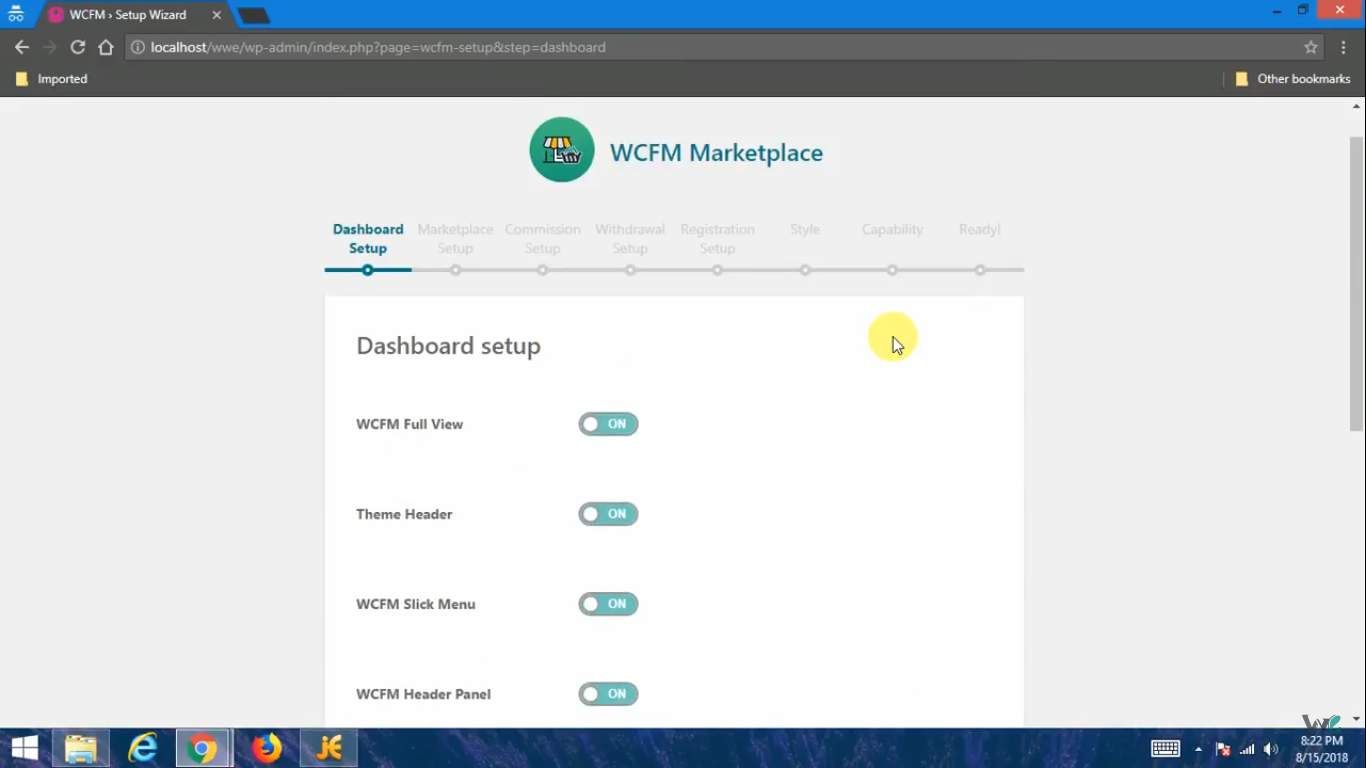
3. The Dashboard setup page will appear. You’ll find some of the features of your dashboard already activated. Activate or inactivate your desired setup by clicking on the on/off button beside the features. Once done, click on Continue.
4. You’ll be taken to the marketplace main setup page. Provide the vendor store URL, i.e., your website’s URL. Click Continue.

5. Similarly, setup the Commission setup, Withdrawal setup, Style and Vendor Capabilities pages as per your preference and click on Continue after completion.
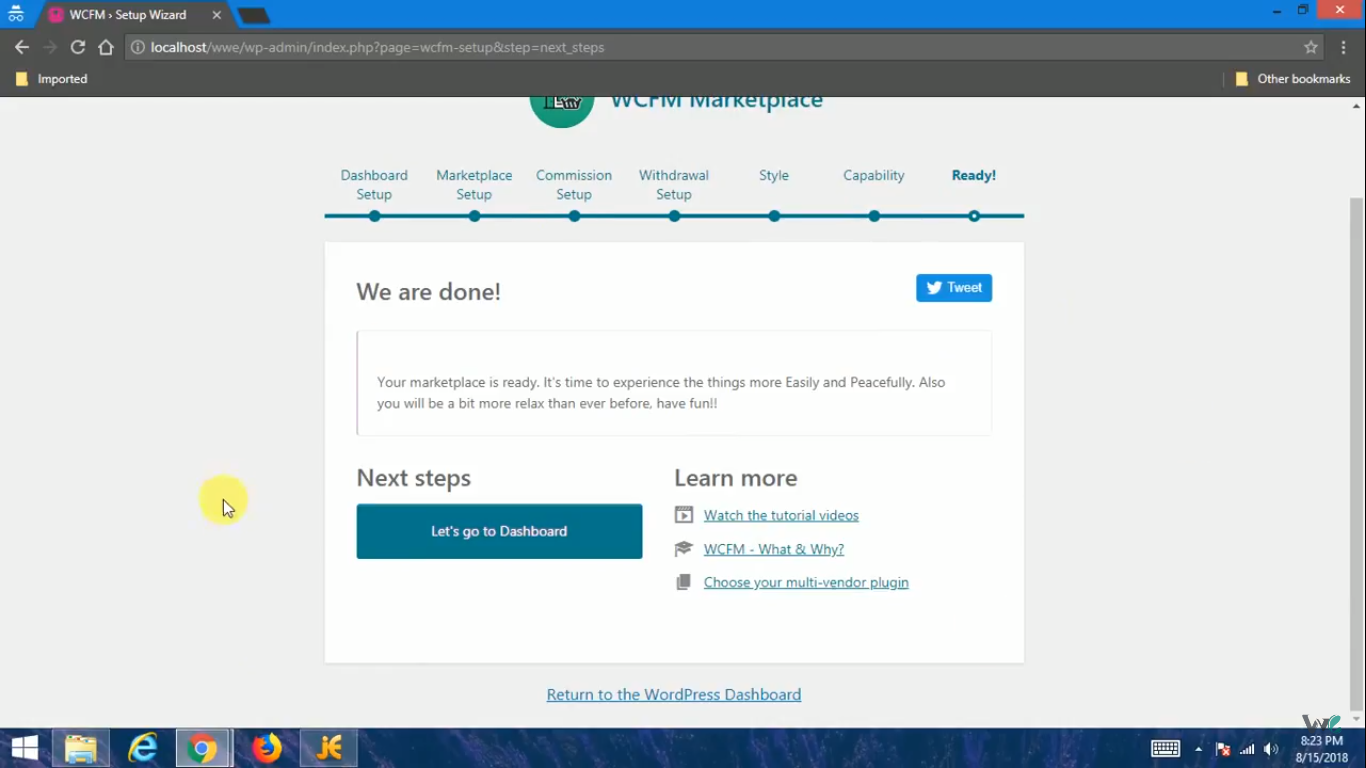
6. Once all the setup stages are completed, you’ll be prompted to go back to the dashboard. Click on Let’s Go to Dashboard and you’ll be taken to the main WCFM Marketplace dashboard.
Congratulations! You’ve successfully setup your marketplace. Now, you can further customize your marketplace from the Settings section in the dashboard and setup your store and store policies as per your requirements. These detailed documentation will guide you through every step of your setup process.
You see, setting up a marketplace on WordPress isn’t difficult. If you sit down to build your marketplace, it will hardly take an hour to complete the basic setup from registering a domain name to solidifying the base of the marketplace.
So, with this, we end our series of articles guiding your from the very inception of your marketplace idea to the actual building of your dream marketplace with WCFM Marketplace.
Now that you have a clearer picture of how you can start your own marketplace successfully, grab your hat and start working on your unique idea!
Good luck!
It’s an remarkable piece of writing in support of all the web visitors; they will obtain advantage
from it I am sure.